Markdown header hierarchy is defined by the number of hash symbols (#) placed before a heading, where one hash creates an H1 and six hashes create an H6. This system gives every document a clear skeleton, organizing content from the broadest topic down to the finest detail. Tools like GitHub, VS Code, and Pandoc all parse this structure to generate navigation, anchor links, and tables of contents automatically. Getting the hierarchy right matters for screen readers, search engines, and anyone reading your document in a plain-text editor. The payoff is a document that is easy to scan, share, and maintain.
Markdown headers hierarchy explained: syntax and levels
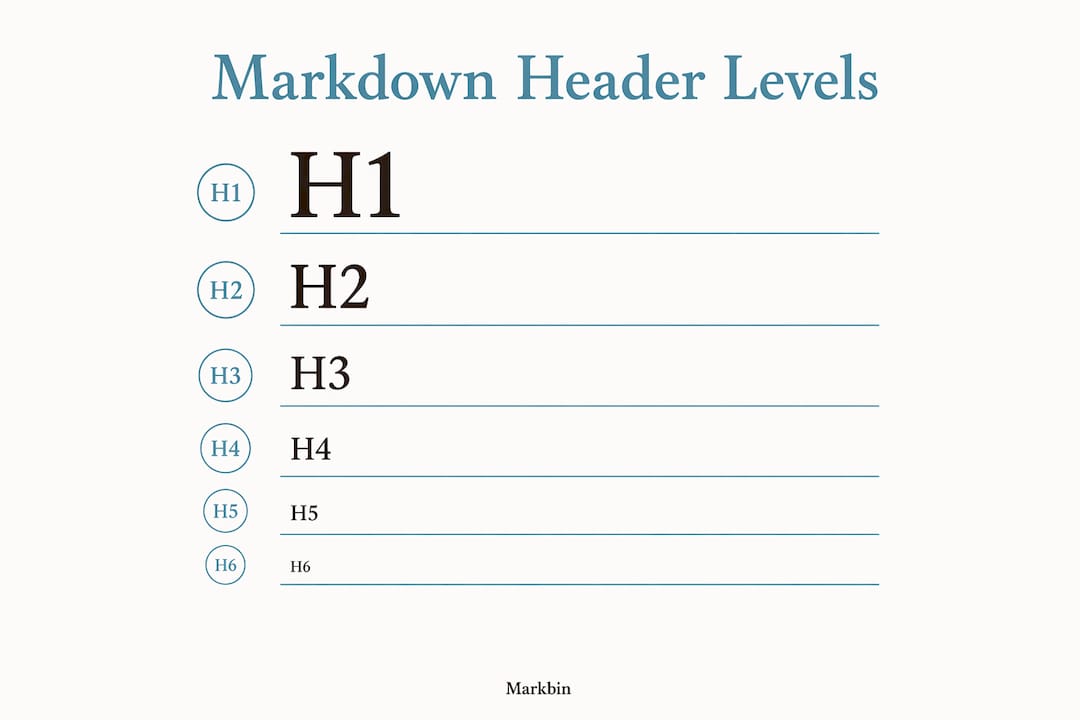
The ATX header syntax uses the hash character (#) to define heading levels 1 through 6. One hash equals H1, two hashes equal H2, and so on down to six hashes for H6. The rule is simple: the more hashes, the smaller and less prominent the heading.
Here is what all six levels look like in raw markdown:
# H1 — Document Title## H2 — Major Section### H3 — Subsection#### H4 — Sub-subsection##### H5 — Minor Detail###### H6 — Smallest Heading
One detail trips up beginners constantly. A single space after the hashes is mandatory for correct parsing. Writing #Heading without a space produces plain text in most parsers, not a heading. Always write # Heading with a space.
There is also a second, older style called Setext syntax. It uses underlines instead of hashes. You place === under a line of text to create an H1, or --- to create an H2. Setext works in some parsers, but it only supports two heading levels. ATX covers all six.
Pro Tip: Always use ATX style with hash symbols. It is unambiguous, supports all six levels, and works consistently across GitHub, GitLab, Pandoc, and every major markdown renderer.
| Feature | ATX Style (#) | Setext Style (=== or ---) |
|---|---|---|
| Heading levels supported | 6 | 2 |
| Syntax clarity | High | Medium |
| Works in plain-text editors | Yes | Yes |
| Recommended for modern use | Yes | No |
Why does markdown header hierarchy matter for SEO and accessibility?
Proper heading structure is not just a formatting preference. It is a functional requirement for accessibility and search visibility. Screen readers used by visually impaired users navigate documents by jumping between headings. If your structure is broken, those users get lost.
Skipping heading levels forces unexpected semantic shifts that deteriorate the experience for assistive technology users. Jumping from an H2 directly to an H4, for example, creates a gap in the document outline that screen readers cannot bridge logically. The fix is straightforward: always move down one level at a time.
Search engines read heading hierarchy the same way. An H1 signals the primary topic of the page. H2 headings signal major subtopics. H3 headings provide supporting detail. When this chain is intact, search engines can map your content accurately and rank it for the right queries.
Using multiple H1 headings per document confuses both screen readers and search engines. One H1 per document is the correct practice. It anchors the entire document to a single, clear topic.
"Markdown's design principle prioritizes readability of source text, making header hierarchy visually meaningful even in raw markdown."
Pro Tip: Before publishing any markdown document, paste it into a heading outline checker. VS Code extensions like "Markdown All in One" generate a live table of contents that instantly reveals broken or skipped levels.
The semantic structure requires a linear hierarchy: H1 leads to H2, H2 leads to H3, and so on. This is not optional for professional documentation. It is the foundation of a document that works for every reader, human or machine.
ATX vs. setext: which header style should you use?
ATX headers are preferred for modern workflows because they are unambiguous, support six levels, and are easier to scan in plain-text editors. Setext headers are a legacy format that survives in older documentation but rarely appears in new projects.

The practical difference matters most when you are writing complex, nested documentation. ATX lets you go six levels deep. Setext stops at two. If your document has subsections inside subsections, Setext simply cannot represent that structure. ATX handles it without any workarounds.
ATX is also more consistent across platforms. GitHub Flavored Markdown (GFM), GitLab, Pandoc, and most static site generators all parse ATX headers identically. Setext behavior varies more between parsers, which creates rendering surprises when you move documents between tools.
ATX headers support complex documents with deep nested sections in a way Setext cannot match. This is the core reason professional technical writers and developers default to ATX in every new project.
Pro Tip: If you are converting legacy documentation that uses Setext headers, tools like Pandoc can batch convert them to ATX automatically. Run the conversion once and standardize your entire library.
The only scenario where Setext might appear in your workflow is when you inherit old documentation or work with a parser that does not support ATX. In those cases, convert as soon as you can. The consistency gain is worth the effort.
Best practices for clean markdown header formatting
Clean header formatting prevents rendering bugs and makes collaboration easier. These practices apply whether you are writing a README on GitHub, a tutorial in VS Code, or a technical spec in Pandoc.
- Place a blank line before and after every heading. Many markdown parsers require blank lines around headers for consistent rendering. Skipping blank lines is one of the most common causes of broken output, even in parsers that tolerate it.
- Use sentence case for headings. Write "How to use markdown headings" rather than "HOW TO USE MARKDOWN HEADINGS." Sentence case is easier to read and more consistent across a document.
- Keep one H1 per document. The H1 is the document title. Everything else is a subsection. Multiple H1s fragment the document's identity.
- Keep headings concise and descriptive. A heading like "Installation" tells readers exactly what follows. A heading like "Some notes on getting things set up" wastes their time.
- Use custom heading IDs where your parser supports them. Advanced parsers like Pandoc support custom header IDs using syntax like
{#custom-id}appended to the heading line. This gives you stable anchor links that do not break when you reword a heading. - Never skip levels. Going from H2 to H4 breaks the outline. Always step down one level at a time.
Here is a quick comparison of good versus poor structure:
Poor structure:
# My Document
### Installation
##### Step One
## Usage
Clean structure:
# My Document
## Installation
### Step one
## Usage
The clean version reads logically at every level. The poor version creates gaps that confuse both readers and parsers.
Pro Tip: Write your headings first before filling in body content. A complete heading outline acts as a document blueprint and reveals structural problems before you write a single paragraph.
How header hierarchy powers navigation and interactivity
Markdown header hierarchy does more than organize text. It drives the interactive features that make documentation actually usable. Most renderers convert your headings into clickable anchors automatically.
Renderers like GitHub, GitLab, and Pandoc auto-generate anchor IDs for every heading by lowercasing the text, replacing spaces with hyphens, and removing special characters. A heading like ## Getting Started becomes the anchor #getting-started. You can link directly to that section from anywhere in the document or from an external page.
This anchor system feeds directly into table of contents generation. VS Code extensions, GitHub's built-in renderer, and tools like Markbin all read your heading hierarchy to build a live, clickable TOC. A well-structured document with clean heading levels produces a TOC that users can actually navigate. A document with skipped or duplicated levels produces a TOC that misleads or breaks.
The impact on developer productivity is real. When a README has a working TOC linked to proper heading anchors, contributors find the section they need in seconds. Without it, they scroll through hundreds of lines looking for context. For teams maintaining large documentation libraries, that difference compounds across every document and every contributor.
Heading hierarchy also connects directly to markdown tables and other structured elements. Tables placed under correctly leveled headings inherit the document's logical structure. Readers know exactly what context a table belongs to because the heading above it tells them.
For a deeper look at how parsers process heading syntax into rendered output, the guide on markdown rendering mechanics covers the full pipeline from raw text to browser display.
Key takeaways
Correct markdown header hierarchy is the single most important structural decision you make in any markdown document, because it controls accessibility, SEO, and navigation simultaneously.
| Point | Details |
|---|---|
| ATX syntax is the standard | Use hash symbols (#) with a space after them for all six heading levels. |
| One H1 per document | A single H1 anchors the document topic for screen readers and search engines. |
| Never skip heading levels | Move from H2 to H3, not H2 to H4, to keep the outline intact for all readers. |
| Blank lines prevent rendering bugs | Place a blank line before and after every heading for consistent output across parsers. |
| Headers generate navigation anchors | Renderers like GitHub and Pandoc auto-create anchor links from heading text for TOC and cross-referencing. |
Why i think most people underestimate markdown header structure
After years of writing technical documentation, README files, and tutorials in markdown, the pattern I see most often is this: writers treat headings as visual formatting rather than semantic structure. They pick a heading level because it looks right in the rendered preview, not because it fits the document hierarchy. That habit causes real problems.
The markdown header hierarchy primarily serves human readers first, and machines second. When I started taking heading levels seriously, the first thing I noticed was how much easier my own documents were to revise. A clean outline makes it obvious when a section is in the wrong place or when a topic needs to be split.
The accessibility argument is the one I find most compelling. Skipping from H2 to H4 is not a minor style choice. It breaks the experience for anyone using a screen reader. That is a real person who cannot use your documentation because of a structural shortcut you took.
My advice: treat your heading outline like a table of contents you would be comfortable publishing. If the outline looks broken, the document is broken. Fix the structure before you fix the prose. Tools like Markbin render your markdown instantly, so you can see the heading hierarchy in action as you write and catch problems before they reach your readers.
The writers who produce the most maintainable documentation are not the ones with the best prose. They are the ones with the cleanest structure. Get the hierarchy right, and everything else gets easier.
— Zack
Write and share structured markdown docs with Markbin
If you are putting these heading practices to work, Markbin gives you a fast, clean environment to write, render, and share markdown documents without setup. Paste your markdown and get a shareable link instantly. Markbin supports full GitHub Flavored Markdown, so your heading hierarchy renders exactly as intended, complete with anchor links and proper nesting. Features like password protection and self-destructing documents make it practical for professional and collaborative use. Whether you are writing technical documentation, team notes, or tutorials, Markbin handles the rendering so you can focus on the structure. For teams managing collaborative documentation, it removes the friction between writing and sharing.
FAQ
What is the correct syntax for markdown heading levels?
Use hash symbols (#) followed by a single space and your heading text. One hash creates H1, two create H2, and the pattern continues through six hashes for H6.
How many h1 headings should a markdown document have?
A markdown document should have exactly one H1 heading. Multiple H1s confuse screen readers and weaken SEO by fragmenting the document's primary topic signal.
Why should you never skip heading levels in markdown?
Skipping heading levels creates fractured outlines that break navigation for screen reader users and produce illogical document structures. Always step down one level at a time, from H2 to H3, not H2 to H4.
What is the difference between ATX and setext markdown headers?
ATX headers use hash symbols and support six levels. Setext headers use underline characters and support only two levels. ATX is the preferred format for all modern markdown workflows.
How do markdown headers generate anchor links?
Renderers like GitHub and Pandoc automatically convert heading text into anchor IDs by lowercasing the text and replacing spaces with hyphens. A heading like ## Quick Start becomes the anchor #quick-start for direct linking.